When the heating goes on and the kitchen drops a few degrees, the same recipe that worked all summer starts to behave differently. Starters take longer to peak, bulk fermentation drags on, and loaves come out dense or gummy even though you followed the timings exactly. Nothing is wrong with your starter or your flour. Fermentation simply runs slower when it is cold.
There are two ways to deal with it: warm the dough up so the recipe’s timings work again, or accept a slower dough and judge it by how much it has risen rather than by the clock. Most winter bakers end up doing a bit of both.
Why a cold kitchen changes everything
The yeast and bacteria in sourdough are much more active in warm dough than in cool dough. A drop of a few degrees can add hours to bulk fermentation, and the effect is larger than most people expect. How much longer depends on your starter, flour and recipe, so no single chart will predict it for your kitchen.
The practical problem is that most published recipes were written in a warm kitchen. If a recipe says “bulk for 4 to 5 hours” and your dough sits several degrees cooler than the author’s, those hours will not be enough. The most common winter fault is not overproofing but underproofing: the dough is shaped before it has fermented enough, and the loaf comes out tight, dense or gummy, sometimes with a few large holes under the crust.
Step 1: measure, don’t guess
A cheap probe thermometer is the most useful winter tool you can buy. Take four readings before you mix:
- the room where the dough will sit
- the flour
- your starter or levain
- and, after mixing, the dough itself
Flour stored in a cold cupboard or garage can be several degrees colder than the room. That matters, because flour makes up the largest part of the dough.
Step 2: warm the water to hit your target dough temperature
Water is the easiest ingredient to change, so bakers use it to correct for everything else. The method is called desired dough temperature (DDT):
Water temperature = target × 4 − (room + flour + starter + friction)
Use × 3 and leave the starter out if the recipe has none. Friction is the heat added by mixing: close to 0 by hand, more with a stand mixer. Use one unit throughout.
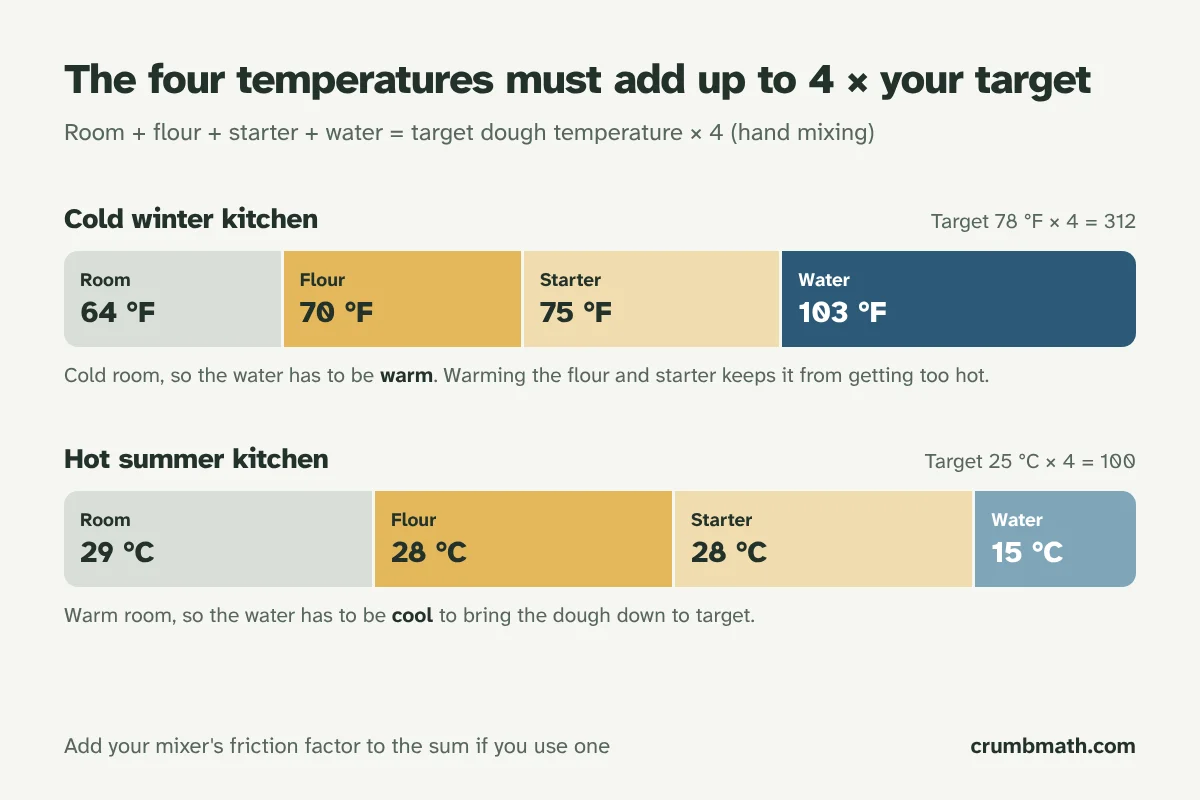
A cold kitchen in Fahrenheit. You want the dough at 78 °F. The room is 64 °F, the flour is 64 °F and the starter is 70 °F, mixing by hand:
78 × 4 − (64 + 64 + 70) = 312 − 198 = 114 °F
That is hotter than you want to pour onto a starter, and the water temperature calculator will warn you about it. The fix is to warm the other ingredients a little. Keep the flour somewhere warmer overnight so it reaches 70 °F, and let the starter rise in a warm spot so it is at 75 °F:
312 − (64 + 70 + 75) = 103 °F
Now the water is warm rather than hot, and the dough still starts at 78 °F.
The same idea in Celsius. Target 25 °C, room 18 °C, flour 18 °C, starter 21 °C:
25 × 4 − (18 + 18 + 21) = 100 − 57 = 43 °C, which is too hot.
With the flour at 21 °C and the starter at 24 °C: 100 − (18 + 21 + 24) = 37 °C.
The diagram above shows why: the four temperatures have to add up to four times your target, so when room and flour are cold, something else has to make up the difference.
Step 3: keep the dough warm during bulk
Starting warm helps, but a small bowl of dough in an 18 °C (64 °F) room will cool towards room temperature over the next few hours. Somewhere warmer for bulk makes a bigger difference. Options bakers commonly use:
- The oven with only the light on. Many ovens get warm this way, but some get too warm. Put a thermometer in first and leave the door ajar if it climbs too high. Stick a note on the door so nobody preheats it with the dough inside.
- The microwave with a mug of just-boiled water. The closed box holds the heat. Replace the water every hour or so.
- A cool box (esky) with a jar of warm water. Cheap and easy to control.
- The top of the fridge or near, not on, a radiator. Check the temperature, since these spots vary a lot.
- A proofing box. The most consistent option if you bake every week.
Whatever you use, put a thermometer in the dough or next to it once, so you know what temperature that spot actually gives.
Step 4: judge the dough by its rise, not the clock
In a cold kitchen, times from a recipe are a rough guide at best. Instead, watch how much the dough has grown. A straight-sided container with a mark, or a small sample in an aliquot jar, makes this easy: when the sample has risen by your target percentage, the whole dough has too.
What target to use depends on your recipe, flour and how warm the dough is, so start with what your recipe suggests and adjust from the crumb you get. If your winter loaves are dense or gummy, let bulk run further next time. If they spread flat and taste very sour, you have probably gone too far.
Your starter feels the cold too
A starter that peaked in five hours in summer may take much longer in winter. Signs it is struggling include slow or small rises and more of the grey liquid (hooch) on top. A few things that help:
- Feed it with warm water so it starts at a comfortable temperature.
- Use a smaller feeding ratio, such as 1:2:2 instead of 1:5:5. Less fresh food means it peaks sooner. The starter feeding ratios guide explains how ratio and timing are linked.
- Keep the jar in the same warm spot you use for the dough.
If your starter lives in the fridge, the guide to feeding it straight from the fridge covers getting it back to full strength before a bake.
Use the cold to your advantage
Cold is not all bad. A slower dough gives you a wider window: it is harder to overshoot, and many bakers like that it lets them fit a bake around a working day. Colder, longer fermentation is also widely associated with a tangier, more sour flavour. If you would rather not fight the cold, plan for it: mix in the evening, let the dough ferment slowly, and shape in the morning. The schedule planner helps you lay those steps out around the time you want bread.
In Australia it is the opposite problem
Bakers in the southern hemisphere are heading into summer, where the challenge is dough that ferments too fast. The same formula works in reverse. In a 29 °C kitchen with flour at 28 °C and starter at 28 °C, a 25 °C target needs:
100 − (29 + 28 + 28) = 15 °C water, which is cool tap or fridge water.
If the formula asks for water near freezing, use the coldest water you can, keep the flour in the fridge, use a little less starter, and check the dough earlier than the recipe says.
Common questions
Should I just add more starter in winter? More starter does speed up fermentation, because the dough starts with more yeast and bacteria. It also changes the flavour and how sour the bread is. Warming the dough is usually the gentler fix; more starter is a reasonable second step. The recipe calculator recalculates the other ingredients if you change the starter percentage.
Can I put the dough on a heater? Direct heat warms the bottom of the bowl far more than the top, and very warm dough can ferment unevenly. A warm space around the dough is better than a hot surface under it.
My dough is still slow even with warm water. Why? Check where it sits during bulk. Warm water only sets the starting point; a cold room will pull the dough temperature down over the next few hours. Measure the dough halfway through bulk to see what is really happening.
What target dough temperature should I use? Use what your recipe asks for. Many sourdough recipes aim for roughly 75 to 80 °F (24 to 27 °C). If your kitchen cannot hold that, a cooler target is fine; just expect bulk to take longer and judge it by the rise.